 XML Software | edit-xml.com
Edit XML With More Comfort
XML Software | edit-xml.com
Edit XML With More Comfort


User Manual For Easy XML Editor Pro v1.3
Content:1.
Open file(s)
1.1 With the open dialog
1.2 Via Drag-and-Drop
1.3 With "Opened Recently"
2. Editing the XML Tree
2.1 Change node name and text content
2.2 Selection lists for node names/attribute names
2.3 Change node type
2.4 Edit node text multi lined
2.5 Editing attributes
2.6 Adding nodes
2.7 Add elements/attributes using dialog
2.8 Copy nodes to the clipboard
2.9 Insert elements and attributes from the clipboard
2.10 Deleting nodes
2.11 Moving nodes
2.12 "Modificator"
3. Quickly add similar attributes/nodes
4. Editing the XML text
4.1 Synchronize changes
4.2 Select node of the tree in XML Text
5. Full-text search/replacement
6. Undo/History
6.1 Activate Track Changes
6.2 List of changes
7. Editing XML data using table view
7.1 Selection of the base node
7.2 Editor for table configuration
7.3 Selector
7.4 Columns
7.5 Save configuration
7.6 Performing the changes to the XML data
7.7 Table editing options
7.8 Export of the table data
8. Encoding
8.1 Open
8.2 Save
8.3 Preset for new files
9. Edit XML graphically
9.1 Open Graphical Editing/Zoom
9.2 Select boxes
9.3 Show/hide sub-nodes
9.4 Edit nodes
9.5 Aligning and distributing
9.6 Control connecting lines
9.7 Save/load layouts
9.8 Print view
10. Output/Print/Export
10.1 Save/Display: Configure XML output
10.2 Printing
10.3 Exporting
11. The most important things in a nutshell
1. Open file(s)
Use the menu item File -> Open
You can also drag files from a file manager into the program window and "drop" them there.

The menu items File -> Opened Recently allow you to find a list of the most recently opened XML files.

2. Editing the XML Tree
2.1 Change node name and text content
There are several ways to change the names and text contents of nodes. You can use the fields above the tree, edit the the "Edit" tab, or edit it directly in the tree. Modifications become immediately visible.

Direct editing can be achieved by:
- Double-click on an element name/value or attribute name/value
- The keys F2, F3 or F4 (see description below in this section)
Name=Text means that name and text are entered separated by an equal sign, e.g. working_time=approx. 10 min.

Alternatively, you can use the following buttons to use a mode directly:
- F2: Change node name
- F3: Change node text
- F4: Change node name and text (Format: [name]=[text])
At this point, you can also specify whether editing is generally possible and whether drag-and-drop is enabled for the tree.
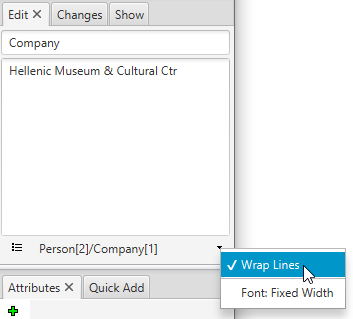
Texts can be wrapped in the "Edit" tab or displayed with a fixed character width font.
These changes are marked in the tree, more
in chapter:
6. Undo/History
2.2 Selection lists for node names/attribute names
Entering a name for a node/attribute displays a list of names that are already known. Such as:

This list is made up of the existing nodes/attributes and names from the specification of XML schema or XML style sheets. For example, if a style sheet is still empty, the names for style sheets are selected:

To do this, the list entry does not have to start with the entered text, also parts of text within a list entry are found.
Which mode is used for selection lists can be set via the menu item Edit -> Selection lists.
Re-Read: Sometimes it may be necessary to re-read the list entries. For this purpose, the menu item Edit->Selection Lists -> Refresh Selection Lists is available. This completely renews the lists of names formed for each file.
To change the type of node, please select the node in the tree and click on the icon "Change Node Type":

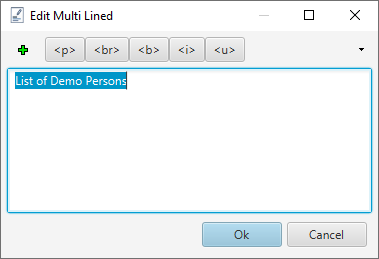
2.4 Edit node text multi lined
If you want to set longer or multiline text for a node, the Easy XML Editor Pro provides the function "Edit Multi Lined". To do this, please select the relevant node in the tree and click on the icon or press CTRL+T (MacOS: CMD+T):

The "Edit Multi Lined" window opens. This makes it easier to edit detailed text on a node.
If a node text contains a line break, it can only be changed by the multiline editing function.
The dialog box also offers the use of short texts. These allow quick input of values (also via short keys).
To edit the attributes, please select the corresponding node. In the "Attributes" tab (right), you can add, delete, and edit attributes.

Changes affect the tree immediately. Helpful keyboard shortcuts for the fields are:
- INSERT, CTRL+DOWN: Add attribute below
- CTRL+DEL: Delete attribute
- UP, DOWN: these buttons allow you to switch between lines
The layout of these edit fields is variable. You can drag the mouse to move the selected boundaries (to do this, hold down the left mouse and move the mouse).

In addition, you can also edit the attributes directly in the tree using the following keyboard shortcuts:
- CTRL+1, CTRL+2, ...: Edit the text content of the 1st or 2nd attribute
- SHIFT+1, SHIFT+2, ...: Edit the name of the 1st or 2nd attribute
- ALT+1, ALT+2, ...: Edit the name and text content of the 1st and 2nd attribute, in the format [Name]=[Text Content]
CTRL+1:
ALT+1:

Select one or more nodes to add a node to. Then use the context menu (right mouse button in the tree) or icon to select the "Add Node" function.
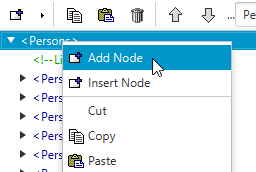
A new subnode is then added to each selected node. Another variation for adding nodes is described in the next point.
2.7 Add elements/attributes using dialog
If you want to add a specific element/attribute to multiple nodes, please select the relevant nodes and press one of the following keys on the keyboard:
- Ctrl+e (MacOS: Cmd+e) To add elements
- Ctrl+Shift+e (MacOS: Cmd+Shift+e) To add attributes

A corresponding input window will appear. Similar to the "Attributes" and "Child Nodes" tabs, the following keyboard shortcuts can be helpful here:
- INSERT: Add entry below
- CTRL+DEL: Delete entry
- UP, DOWN: these buttons allow you to switch between lines

Please enter the name and text content for the new nodes and confirm them with "Ok". The elements/attributes are added to the selected nodes.
2.8 Copy nodes to the clipboard
You can have a selection of nodes copied as text to the clipboard.
To do this, select the relevant nodes (with the CTRL or SHIFT key pressed) and select Copy.
You can make settings for copying in the "Changes" tab:

- The "Copy Node Only" option ignores the path of the selected nodes during the copy operation.
-
The "As Full XML File" option ensures that the copy result is a valid XML file.
The introductory XML tag is preceded

-
The "Copy Full Paths" option adds the full path of the selected nodes during the copy operation.
The result of the copy operation with the Copy Full Paths operation:

and, if necessary, an additional tag is added to accommodate the selected nodes. This is necessary because an XML file is only accurate may have a root node:

2.9 Insert elements and attributes from the clipboard
To do this, select one or more nodes to add the contents of the clipboard to. Via the context menu (right mouse button) or the corresponding icon you can reach the paste function.
You can also insert attributes. To do this, text in the format [name]="[text]" must be in the clipboard, several lines are possible. Here is an example. This adds the "id" and "type" attributes.

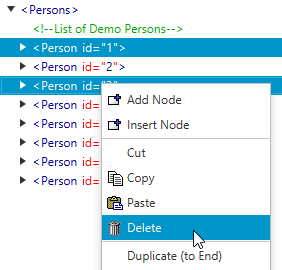
You can delete one or more nodes with an operation. To do this, select the relevant nodes and select the delete function via context menu (right mouse button) or icon.
Use the Move option to change the order of a node's child node. To move the node in question and click on the corresponding icon.

For easier handling, the move operations can also be triggered by mouse wheel. To do this, select a node and hold down the ALT key (or: Ctrl). Now move the mouse wheel up or down, the node is moved accordingly.
You can do the same with ALT+Arrow up, ALT+Arrow down.
The so-called Modificator allows you to formulate a set of conditions. If they apply to one or more nodes, appropriate actions can be applied to the nodes concerned.
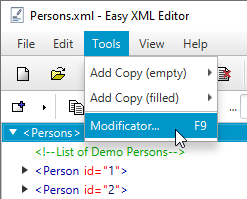
This allows very flexible correction operations. The modifier can be reached via Tools->Modificator:
In this example, a child "Rating" is added for each node "Person" with existing attribute "name":

You can have the actions applied to the current file (see window title) or all open files. If "Selection Only" is enabled, searches only from the selected node.
3. Quickly add similar attributes/nodes
The Easy XML Editor Pro provides the ability to easily create copies of existing attributes/nodes that could fit in place.

The "Quick Add" tab displays the suggestions:

Moving the mouse over the entries will display a preview. Click on a suggestion to add it. The option "Add Empty" removes all text content if activated.
4. Editing the XML text
As an alternative to editing the XML data in the tree view, you can also edit the XML text directly. You can apply changes to XML text back to the tree view.
When the file is open, you can reach the XML Text via the icon in the toolbar.

Use "Apply Changes" and "Discard Changes" to apply the changes in XML text to the tree or discard any changes you make.

4.2 Select node of the tree in XML Text
For better orientation, you can select XML text for a node in the tree using the "Select In XML Text" function.

5. Full-text search/replacement
The full-text search can be accessed via the "Search" tab in the lower part of the main window:

Here you can perform a full-text search of the nodes and node attributes of the XML tree. The search results are conveniently displayed in a list.
For example, the list of search results might look like this:

When you click on a row of the list, the XML Tree view jumps to that node.
The following options are available for the search:
- Case sensitive: If this setting is deactivated, findings with a different case are also listed
- Full Match: When enabled, only findings that exactly match the input are listed. That is, there is no additional text before or after it. If disabled, everything that contains the input is found.
- New List For Result: Opens a new tab with every search performed, if this option is activated
- In Elements: Here you can enable/deactivate whether you want to search for item nodes in name or text content or namespaces.
- In Attributes: Here you can activate/deactivate whether attributes should be searched in name or text content.
- More node types: These options allow you to specify whether to search in comments, CData, or Processing Instructions.
- Find node types: If this option is enabled, the node types selected with the other options are found, regardless of their contents. For elements or attributes, these are already found when one of the two check marks is set. For example, if you want to list all comments, select "Comment" and "Find Node Types".
- Replace...: Replaces the search text directly for all search results. Alternatively, you can select individual finds in the results list and have them replaced using the context menu (right mouse button). Replacement in namespaces is not possible.
6. Undo/History
The Easy XML Editor Pro can mark all changes to the XML Tree.
Whether changes are marked in the tree display, use the menu item View->Track Changes:

If this option is activated, changes are marked in color or with strikethroughs.
All changes to the XML Tree are listed in the Undo/History tab. You can find the tab in the lower part of the main window:

With the "Undo/"Redo" or CTRL+Z, CTRL+Y buttons, you can take one step back or forward.
Via the menu item "Clear History..." (also in context menu of the undo list) you can delete the change history. This will no longer mark the changes, please note that you will not be able to undo/redo.
7. Editing XML data using table view
With the Easy XML Editor Pro, you can map your XML data to tables and make changes in a completely new, clear way.
To do this, you need to specify how the XML nodes are mapped to a table. The following example shows how this can be done:
7.1 Selection of the base node
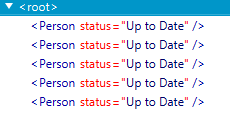
Please select the node whose children or children contain the data to be edited. In our example, this is the root node "Persons". It contains several recipes with their data:

7.2 Editor for table configuration
Child nodes are already found that have further content, by clicking on the buttons an automatic configuration for child nodes can be used (Button "Person: 8x"):

Then open the configuration by clicking on the gear icon:

The editor opens:
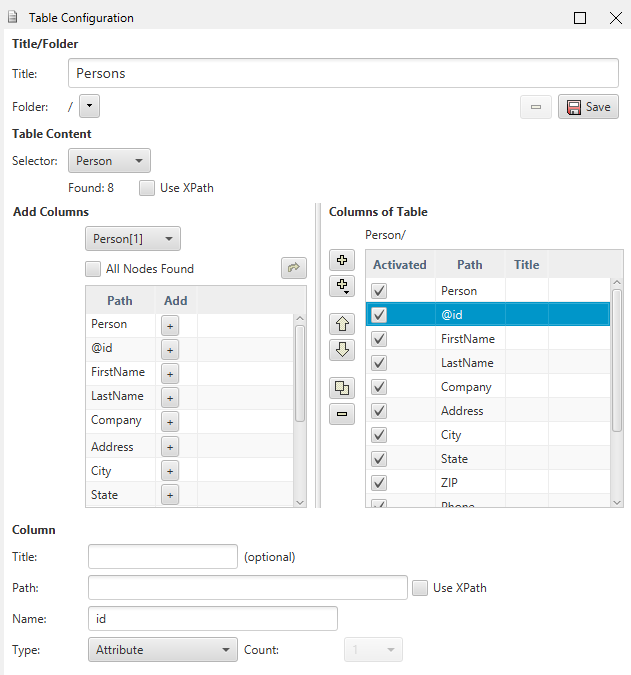
It is used to determine the table configuration, more information in the next step.
The selector determines which rows are visible in the table. A line appears for each element selected in the XML.

XPath: Using XPath is an alternative to selecting content/elements. You enter your own XPath expression.
The disadvantage of XPath, however, is that only existing content can usually be found and edited with it.
Starting from the selector, set different columns. The optional path specifies how the element/attribute can be reached from the selected element of the row of the table.

There are different types of columns:
- Attribute: For a column definition of type Attribute, set the path (optional) and the attribute name (without @-Character)
- Element/Comment/Text/CData/Processing Instruction: For a column definition of an content, specify the path, name, and number of columns. For several columns, the elements with the same name are addressed, e.g. working time[1], working time[2], working time[3], ...
- Index: These columns contain counters for element nodes
- Parent Column: Shows text content of a parent element in the hierarchy
For further use, the table configuration can be stored in the current user's user directory.
Enter a suitable title and write with the "Save" button. Table configurations are XML files that are organized by "Manage..." in the table configuration select list in the "Table Edit" tab, can be deleted/moved.
7.6 Performing the changes to the XML data
Saving a created table configuration selects it to edit the data.
Double-clicking a cell in the table allows you to change the value directly.

Each change immediately affects the tree view:

-
Insert line
Using the "Add Row(s)" icon to the left of the table, you can insert a new row below the selected row:

You can also do this with the keyboard shortcuts INSERT and CTRL++.
-
Delete line
You can delete the selected row of the table using the "Delete Selected Rows" icon to the left of the table:

You can also do this with the CTRL+DEL key combination.
-
Fix to current node
Normally, the contents of the table change when you select a new node in the tree. This can be prevented by enabling the "Fix to current node" option. If the selection of the tree is changed, the table view remains on the previously selected node.

-
Open multiple tables/table in new window
It is possible to open multiple tables at the same time and, if necessary, offload them to windows. The tables can also depend on each other, i.e. the selection in one table determines the contents of another table.

-
Sort table
You can sort the table by individual column. To do this, please click to the corresponding column title 1x or 2x depending on whether the sorting should be ascending or descending.

Right-clicking the column title and "Reset Sorting" cancels the sorting setting.
-
Change values
You can easily change data from multiple rows with the "Change Values" feature. To do this, select the relevant lines. With selecting rows the CTRL and SHIFT keys will help you. When the CTRL key is pressed, a clicked line will be added to the selection. With SHIFT pressed, all lines between the last selection and the clicked line are added. This allows you to select any combination of rows.
If rows are selected, please click right-click in the table. A menu will appear with the item "Change Values..." and click on it.
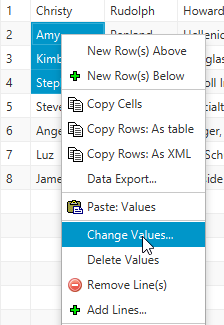
The "Change Values" window will appear. By selecting the check boxes, you specify whether the value of this column should be reset at all. If so, please enter the new text to the right of it.
Use the "delete" check boxes to remove the node (with subnodes!) or attribute.

You can export the table a) to the clipboard b) to a file or c) different files in a directory. To do this, choose "Data Export..." in the context menu or the icon "Options: Edit Table"->"Export...":

A dialog box opens, here you can make various settings for export:
- Format: CSV, HTML or Text with fixed column widths
- Delimiter: This character separates the entries of each column from each other
- Field limiter: (optional) Specifies the character used to enclose the values, usually " or '
- Add headings: If enabled, the first row is a row with the column labels
- Text for [no value]: Entered in cells that have no value (no element/no attribute present)
- Export destination: To the clipboard, a single file or all tables of the current XML file to different files in a directory
By clicking on the "Export" button, the data is exported according to the settings.
The settings of this dialog also affect the copying of table cells (Delimiter, Field limiter, Text for no value)
8. Encoding
When a file is opened, the encoding will be determined automatically.
Please use the menu item File->Encoding to specify in which character encoding the file should be stored:

On the Encoding page of the Options dialog, you can set the default for new files. This setting is also used when no encoding can be detected when opening a file (for example, if <?xml encoding="..." ?> is missing).

9. Edit XML graphically
With the Easy XML Editor Pro, you can also edit XML files as a graph. To do this, the individual nodes are displayed as rectangles, which you can arrange as desired. The following illustration shows an example:

When represented as a graph, each node consists of these components:
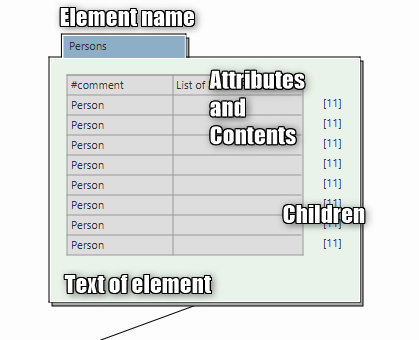
In the following, the graphical representation of a single node is referred to as a "box".
9.1 Open Graphical Editing/Zoom
You can enter the graph view via the corresponding icon in the toolbar:

A zoom can be selected for the view (top right). You can also adjust the zoom with the mouse wheel while the CTRL button is pressed.

To select multiple boxes, drag a border while holding down the left mouse button.

Selected boxes are marked. You can also use the SHIFT-Key to add new boxes to the current selection.
To display the bottom nodes, click the number in the parent node line, and click the "x" to hide a node in the upper right corner.

Alternatively, you can view/hide all subnodes by clicking a right-click free area in the box and selecting "Show All Children", "Hide All Children" or "Hide Element" from the context menu.

The data of a displayed node can be changed directly in the graph. To do this, select a box in the view (by clicking with the left mouse button). The individual fields can also be selected directly.
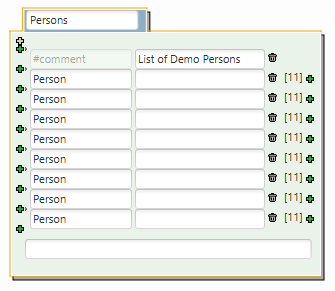
To change the texts, simply change the field contents.
The Plus signs on the left are for adding (at the end) and inserting (in between) contents or attributes.
The Plus signs on the right to add child nodes to the corresponding node.
Click on the Trashbin-Icons to delete the respective child node or attribute.
The alignment and distribution functions can be accessed either via the icons on the left or via the context menu.


For each box, you can specify in which direction the lines leave them. In this example, the lines leave the top box down. (Default is "from the right")

To achieve this, select one or more boxes and select one of the icons on the left.
The location where the lines hit the child nodes is adjusted accordingly.
To continue editing at a later time, you can save the arrangement of the boxes in a so-called layout and load them again later. The list of layouts is located at the top left of the window:

Click on the "Save" button to save a layout.
 A dialog box appears to enter the name of the layout. The currently displayed arrangement of the boxes is then written to the layout.
To load a layout, select an entry from the list. A layout stores which child boxes are positioned where. It is therefore also possible to apply a layout to a different XML file than it was created with.
You can print the current view by clicking on the icon (left in the window).
10. Output/Print/Export
10.1 Save/Display: Configure XML output
To control the output of the XML text, you can specify more precisely:
- Indentation: how are the levels visually separated from each other
- Entities: which entities are stored as characters or in the form &#nnnn;
- Output: Special parameters for the output
- Attributes: Sort order of attributes (alphabetically sorted/sorted by text length)
- Attributes: Indenting attributes by after length
The settings can be found in the "Options" dialog box (Menu View>Options):

Indentation: For indentation, you specify which character is used to indent (space, tab) and the number of characters for every new level.
Entities: When saving XML, special characters (so-called entities) can either actually be stored as characters (e.g. €, &), or instead stored encoded in text (e.g. € for the euro sign). You specify how the special characters are written in elements or attributes on this page.
Numeric encoding for entities from 160: This means that the relevant special characters starting from decimal 160 will be encoded:   ¡ ...
Some settings (&, <, ") are not changeable because they are mandatory to create valid XML files.
Attributes:

Output attributes sorted: Here you can sort attributes by attribute name or text:
- Alphabetical
- By text length: Visually, the text length is often a criterion for beautiful XML, with this you can arrange the attributes with the shortest text first
Indent attributes: Here you specify how many characters attributes can take until a line break is inserted. For example:
Without indentation:

With indentation:


Left-aligned means that the attributes are indented with the beginning of the first attribute.
You can output the currently visible section of the tree view or the text view of an XML file to a printer.
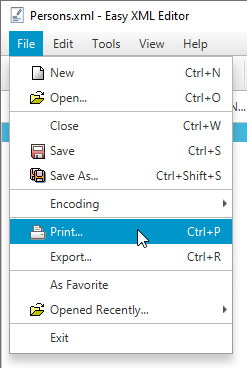
To print the current view of the XML tree, select the "File -> Print..." menu item.
Several export options to HTML/Markdown/CSV/Text/JSON are available.
To do this, select the entry "File -> Export..." from the menu.

For example, the result is as:

11. The most important things in a nutshell
This section summarizes the most important usage notes for the Easy XML Editor Pro, which are not immediately recognizable even for experienced users at first glance.
-
Drag-and-drop (open):
Open via drag-and-drop: You can open files by dragging them from the operating system's file manager to the Easy XML Editor Pro window. Details for this in Section 1.2 . -
Quickly add element nodes/attributes:
You can easily add subnodes/attributes to a number of nodes. To do this, select a few nodes and press the shortcut combinations Ctrl+e or Ctrl+Shift+e on the keyboard (MacOS: Cmd+e, Cmd+Shift+e). A window appears to enter the data for the new elements/attributes.
Details on this in Section 2.7 . -
Keyboard layout (MacOS: Cmd instead of Ctrl):
In the tree view of the XML data, you can use the following keyboard shortcuts:- CTRL+C: Copy
- CTRL+V: Insert
- CTRL+X: Cut
- CTRL+D: Duplicate nodes
- CTRL+S: Save
- CTRL+W: Close file
- CTRL+Q: Show/do not show changes
- INSERT: Add nodes
-
DEL: Delete nodes
- CTRL, SHIFT: hold down and click, CTRL adds individual nodes to select, and SHIFT adds a range of nodes to the selection
- Ctrl+e, Ctrl+Shift+e: Quickly add element/attribute (see Section 2.7 )
- ENTER: With selected node edits the node, with edit mode as set in "Changes" tab
- F2 or SHIFT+ENTER: When selected node edit the node name (see Section 2.1 )
- F3 or CTRL+ENTER: When the node is selected, edit the node text (see Section 2.1 )
-
F4 or ALT+ENTER: When selected node, edit the node name/node text (format: [name]=[text]) (see
Section 2.1
)
- CTRL+1, CTRL+2, ...: Edit the text content of the 1st or 2nd attribute
- SHIFT+1, SHIFT+2, ...: Edit the name of the 1st or 2nd attribute
- ALT+1, ALT+2, ...: Edit the name and text content of the 1st and 2nd attribute, in the format [Name]=[Text Content]
These keyboard shortcuts are available in table editing:- INSERT, CTRL+DOWN: Add line below
- CTRL+UP: Add line above
- CTRL+DEL: Delete marked rows
- CTRL+SHIFT+C: Copying the selected rows as table/CSV data
- CTRL+V: Insert cell values (CSV data or data from spreadsheet program)
In the "Attributes" and "Child Nodes" tabs:- INSERT, CTRL+DOWN: Add entry below
- CTRL+DEL: Delete entry
- DOWN, UP: switch between the lines
- Move nodes: With the ALT key pressed, you can change the position of a node with the mouse wheel or with the arrow keys UP/DOWN
-
Edit graph:
- SHIFT: Add elements to selection
- CTRL+Mouse Wheel: Change Zoom